
Thoughts about clean architecture

· 8 min read
3sam3
Backend Developer

If you prefer english, I recommend you to use immersive translation or google translate.

클린 아키텍처란?

onion-architecture 
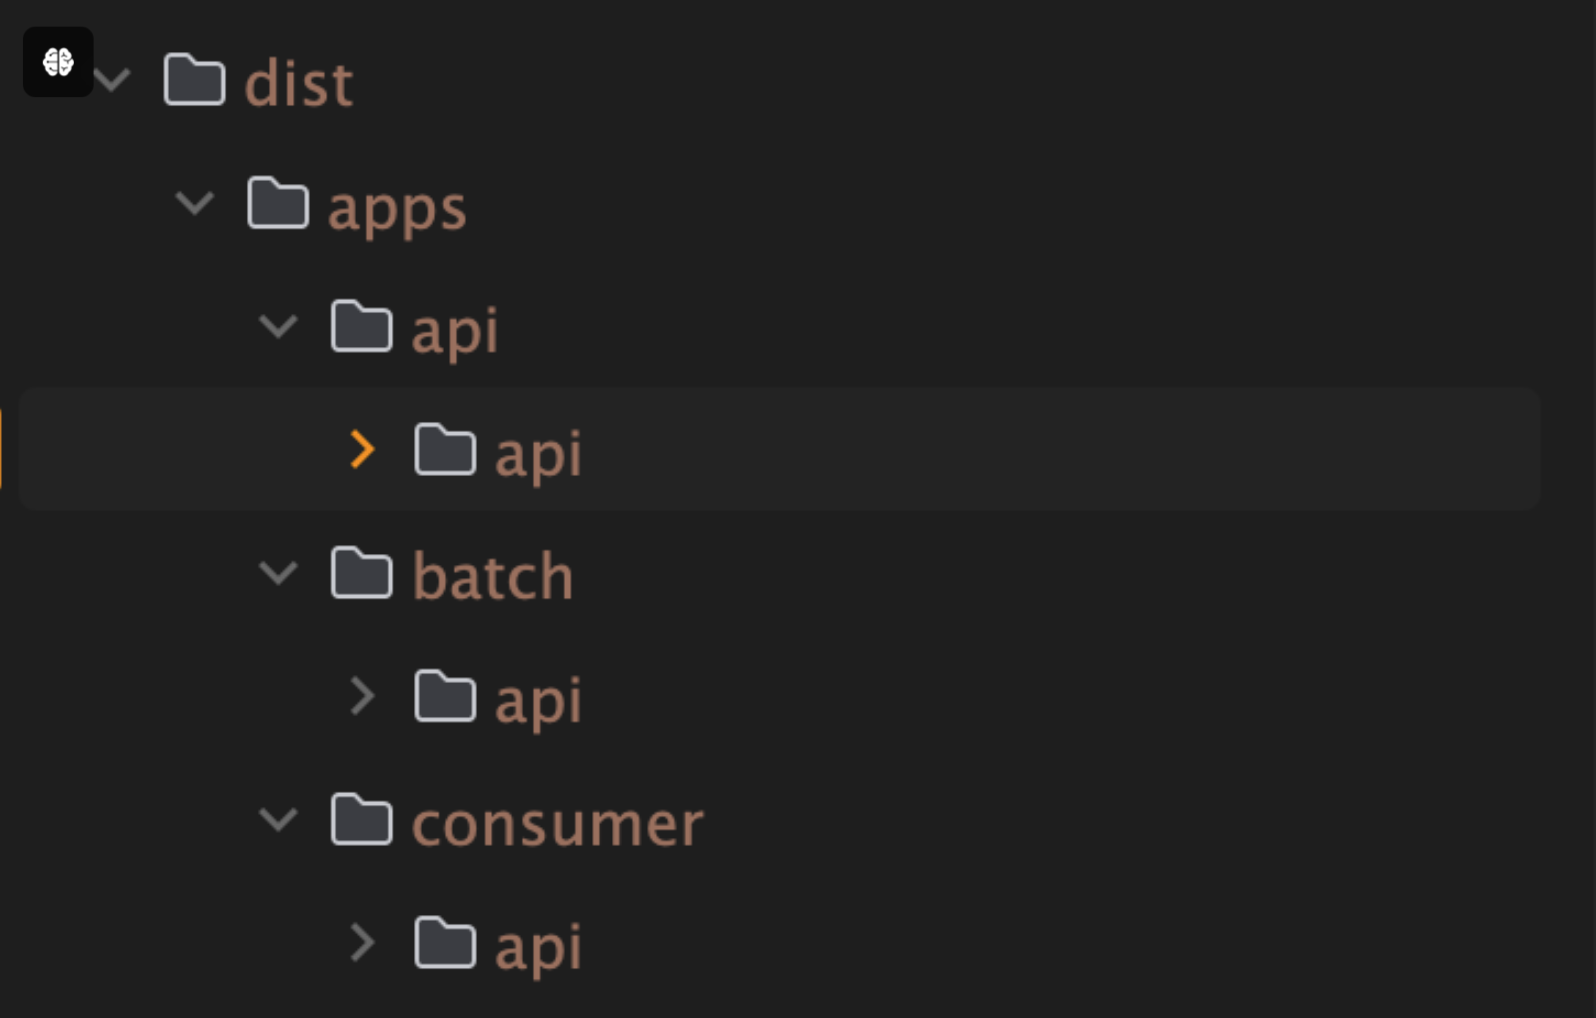
출처: NestJS and Project Structure - What to Do?

클린 아키텍처는 Robert C. Martin(AKA uncle Bob)에 의해 고안된 소프트웨어 아키텍처 패턴이다. 모든 아키텍처 스타일과 마찬가지로 유연하고 테스트하기 쉬우며 유지보수가 용이한 시스템을 만들기 위한 아키텍처 스타일이다.

구체적인 방법론이라기보다는 '이렇게 하면 좋더라'라는 가이드라인 내지는 철학의 집합에 가깝다.

Layered Architecture

잠시 Layered Architecture에 대해 알아보자.

Layered 말 그대로 계층의 분리를 통해 관심사의 분리를 이루는 아키텍처 스타일이다. 공장의 각 라인마다 담당하는 역할이 다른 것과 유사하다.

3,4 계층은 아래와 같이 분류한다.

3계층

  • Presentation Layer (UI Layer)
  • Application/Business Logic Layer (Domain Layer)
  • Data Access Layer (Infrastructure Layer)

4계층

  • Presentation Layer (UI Layer)
  • Business Logic Layer (Domain Layer)
  • Persistence Layer (Repository Layer)
  • Datasource Layer

3계층과 4계층의 차이는 Business Logic Layer와 Persistence Layer의 분리 여부이다.

  • 3계층의 Application/Business Logic Layer는 비즈니스 규칙과 DB에 대한 접근에 대한 역할을 모두 담당한다.
  • 4계층의 Business Logic Layer는 비즈니스 규칙에 대한 역할만 담당하고, Persistence Layer가 DB에 대한 접근을 담당한다.

Nest.js와 같은 프레임워크를 이용해 프로젝트를 초기 구성할때 위와 같은 구성으로 프로젝트가 세팅된다. Spring 등의 프레임워크를 이용하다보면 자연히 손과 눈에 익게되는 구조이기도 하다.

엉클밥은 레이어드 아키텍처는 자연스레 Database-centric한 설계를 유도하게 되므로 데이터베이스 의존성이 전파되는 등의 문제점이 있어 Clean Architecture를 고안하게 되었다고 한다.

Clean Architecture

clean-architecture.png

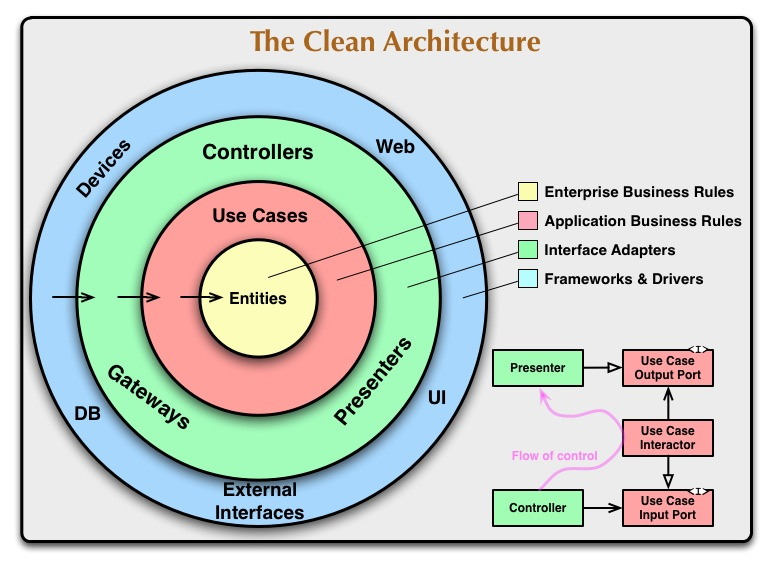
Layered Architecture 로는 무언가 부족했기에 그걸 개선한 Clean Architecture가 고안되었을 것이다.

레이어드 아키텍처의 핵심 문제 중 하나는 상위 계층(비즈니스 로직)하위 계층(DB, UI)에 직접적으로 의존하는 구조이다.

그로 인해 생기는 문제점은 아래와 같다.

  • 하위 계층의 변경이 상위 계층에 파급 효과를 일으킨다.
  • 특정 기술 스택에 대한 종속성이 높아진다.
  • 시스템의 유연성과 테스트 용이성이 저해된다.

해결책은 고수준 모듈(비즈니스 로직)저수준 모듈(데이터베이스 구현체, UI 구현체 등)에 의존하지 않고, 양쪽 모두 추상화(인터페이스)에 의존하게 만드는 것이다.

레이어드 아키텍처로 4계층 레이어드 아키텍처를 단순하게 구현하면 아래와 같은 구조가 된다.

export class UserRepository {
async findUserById(id: number) {}
}

export class UserService {
private userRepository: UserRepository;

constructor(userRepository: UserRepository) {
this.userRepository = userRepository;
}
}

만약 이 상황에서 DB를 변경하고 싶다면, 위의 구조에서는 쉽지 않을것이다. 아래와 같은 구조에서는 추상화된 인터페이스를 통해 의존성을 주입받기 때문에, DB를 변경하는 것이 훨씬 수월하다.

GoF 디자인패턴의 추상xx 패턴이 생각난다.

export interface IUserRepository {
findUserById(id: number): Promise<null>;
}

// concrete.user.repository
export class ConcreteMongoUserRepository implements IUserRepository {
async findUserById(id: number) {}
}

// 클린아키텍처 다이어그램의 use-case 계층. (사용례가 중요하지 계층별 이름을 그대로 사용하는것은 중요하지 않다고 생각하여 service 라는 이름을 사용하였다.)
// user.service
@Injectable()
export class UserService {
private userRepository: IUserRepository; // 인터페이스에 의존

constructor(
@Inject('ConcreteMongoUserRepository')
userRepository: IUserRepository
) {}
}

Adapter

외부 세계와 내부 비즈니스 로직을 이어주는 다리 역할을 하는 친구다. 외부 시스템이 가지는 자체적인 모델과(API, DB) 내부 비즈니스 로직이 가지는 Entity 또는 VO(Value Object) 간의 변환을 담당한다.

아래와 같이 분류하기도 한다.

  • Primary Adapters (Driving): 외부에서 애플리케이션을 호출 (Controller, CLI, Web API)
  • Secondary Adapters (Driven): 애플리케이션이 외부를 호출 (Database, File System, External API)

Hexagonal Architecture

hexagonal-architecture.png

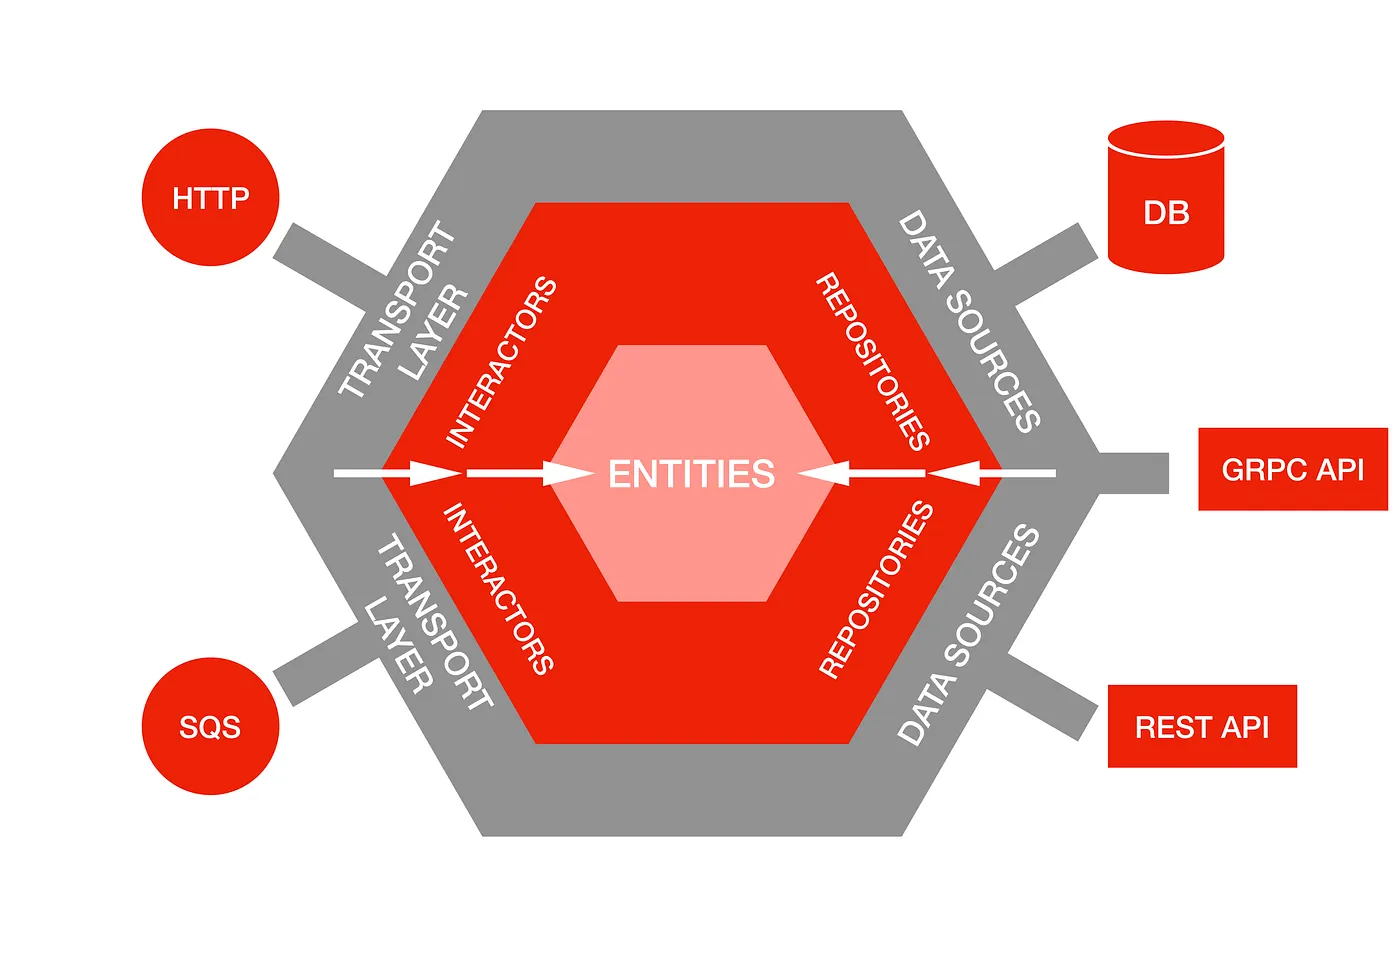
port-and-adapter 패턴이라고도 불리는데, 기본 원칙들만 존재하는 클린아키텍처를 조금 더 구체화한 패턴이다. 프레임워크 느낌?

in & output 포트와 그 앞단의 Adapter를 이용해 입출력 응답에 대한 부분을 추상화하였다.

정리

클린 아키텍처 스타일에 대해 간략하게 정리해보았다.

개인적으로 클린 아키텍처 스타일이란건 요리 레시피에 더 가깝다고 생각하는데, 내 프로젝트가 어떤 성격인지에 대한 생각없이 좋다고 무작정 적용하다보면 라면가지고 코스요리 만드는 꼴을 볼 수 있다고 생각한다. 프로젝트의 구조를 변경해버리는 아키텍처 스타일의 변경을 도모할 때는 더더욱.

모든 아키텍처 스타일이 그렇듯 관리를 위해 복잡성을 올리는 형태이기 때문에 적절한 선에서 타협하는 것이 중요할 것 같다. 1 안 그러면 팀원들에게 욕이란 욕은 다 들어먹게 될 것이다.

References

Clean architecture

Hexagonal architecture

Git - Personal Access Token

· 2 min read
3sam3
Backend Developer

Overview

remote: Support for password authentication was removed on August 13, 2021. Please use a personal access token instead.
remote: Please see https://github.blog/2020-12-15-token-authentication-requirements-for-git-operations/ for more information.

There was a time when GitHub suddenly stopped supporting authentication using ID and password. Since then, I've had to configure related settings multiple times, but I always forget how I did it and have to look it up again. Now I need to set it up once more, and this time, I'm going to write a post about it so I don't forget.

Personal Access Token

PAT is alternative to password.

It doesn't grant access to the entire account, and it's safer because it has an expiration date and allows access only to the configured permissions. Unless you didn't include all permissions and infinite expiration date.

Fine-grained vs Classic

comparison

How to Generate token

You can go to the page below to get it issued. The fine-grained token is still in beta, so some features are not supported.

Personal Access Tokens (Classic) Token Generation

How to extract token from keychain

If you forgot what your PAT is, You might able to extract from keychain.

keychain

Usage

Package Registry

read:packages permission required.

# ~/.npmrc
//npm.pkg.github.com/:_authToken={{ YOUR_PAT_TOKEN }}
@{{ YOUR_PACKAGE_PREFIX }}:registry=https://npm.pkg.github.com/

References

Node Manager (nvm, fnm)

· 2 min read
3sam3
Backend Developer

Overview

A Node.js version manager is a tool that helps you easily switch between different Node.js versions. By using a Node.js version manager, you can use different Node.js versions for each project, which prevents Node.js version conflicts between projects.

I will introduce nvm and fnm below, but it doesn't matter which tool you use.

You probably don't install Node versions that often, and even if you do, there doesn't seem to be much difference. I think you can choose the tool that suits your taste or that you are familiar with

NVM (Node Version Manager)

It is a commonly used Node.js version manager.

Compared to fnm, which I will introduce later, it doesn't have any particular functional advantages. However, it has the advantage of having significantly more references

Installation

Run following script,

$ curl -o- https://raw.githubusercontent.com/nvm-sh/nvm/v0.40.1/install.sh | bash

Write following script to your shell configuration file, to load nvm module.

# ~/.zshrc
export NVM_DIR="$HOME/.nvm"
[ -s "/opt/homebrew/opt/nvm/nvm.sh" ] && \. "/opt/homebrew/opt/nvm/nvm.sh" # This loads nvm
[ -s "/opt/homebrew/opt/nvm/etc/bash_completion.d/nvm" ] && \. "/opt/homebrew/opt/nvm/etc/bash_completion.d/nvm"

FNM (Fast Node Manager)

It is an improved Node.js version manager.

It's fast and has low memory usage. Furthermore, once installed, you don't need to configure environment variables or anything else.

Installation

$ brew install fnm

Comparison

I made comparison table using chatGPT. comparison

References

What is CORS (Cross Origin Resource Sharing)?

· 3 min read
3sam3
Backend Developer

What is CORS?

CORS (Cross-Origin Resource Sharing) is a system, consisting of transmitting HTTP headers, that determines whether browsers block frontend JavaScript code from accessing responses for cross-origin requests.

ㄴ️Technically, that is the definition of CORS, but down below is what I think.

Mechanism to block unwanted requests in browser.

Preflight Request?

Before discussing how CORS cuts off unwanted requests, we have to talk about what a preflight request is.

I'll try to make it short.

d2

If you make an actual request (by event or something), the browser makes a pre-request to see if the server is aware of using specific methods and headers.

This is basic behavior browser does before it makes a request.

By using this, we can avoid server running which we're not going to take data from and can ensure safety (by getting only getting data from known sources).

Without Preflight Request

d2

Using Preflight Request

d2

How CORS Works

browser verifies whether origin is allowed in Access-Control-Allow-Origin field of header in response.

This checks whether protocol + host + port is the same or not. (Same Origin Policy)

protocolhostportpathquery stringfragment
https://google.com:443path?name=sam#cache

How to deal with CORS?

  • Modify server to return Access-Control-Allow-Origin field in response.
    • Try not to use *. This could possibly cause serious security issues.
  • Use a Reverse proxy of Webpack Dev Server.

References

MSA consideration

· 3 min read
3sam3
Backend Developer

Before We Start

Let's make sure we're on the same page with terminology

Domain

A unit that logically implements actions and responsibilities (This could either be logic or policy)

I won't make a diagram for this.

Service

A unit that provides data/behavior as a single function (domain + data)

If it's about a product, it could be named product service.

d2

Application

A unit that combines one or more services and a user interface (service + user interface)

d2

What is MSA?

It is about breaking your applications into small pieces (services) which do specific jobs that match their domain.

That is why it is called Micro Service Architecture

Should I go for it?

I can't give you an answer.
It's your call.

Just remember this before you adopt MSA.

Martin Fowler said,

Don't even consider microservices unless you have a system that's too complex to manage as a monolith.

Bright side

  • Can prevent the failure of Service A from propagating to Services B, C, and D.
  • Able to implement distributed systems flexibly and consistently
  • Free from considerations in adopting HW / SW technologies. (just matching interface will do)
  • Reduction in build & test time.

Dark side

  • Development complexity and proficiency
  • transaction management
  • testing (when multiple services are involved)
  • maintenance (troubleshooting, monitoring)

Some points I want to talk about MSA

Personally, I think it's all about making boundaries of the domain.

Do Event Storming and determine where things should be.
We'll start from there.

Avoid Too Many Microservices Being Made

I saw an ugly case.
There were so many microservices, there were some services no one knew. Heard the name, but had no idea what it did.

If you consider adopting MSA,
You need to compromise at the point where your team can manage when defining the domain.
Even though the functions it provides don't match its name.

Try not to make a new domain service every time.\ If you already have too many microservices that you can't handle, merge them.

If DB transaction is a viable option, use it

Separating all the databases into pieces and implementing Distributed Transaction could be a stupid approach.

I'm not saying Distributed Transaction such as SAGA, 2PC are not good.

Those are cool stuff, but it's going to take a lot of resources to develop/maintain them.

What I'm trying to say is, DB transaction is what you can almost always rely on.

Filter out domains that can't be changed due to external dependencies

Don't mess with them.

Ref

Don't use SWC when you're using Nestjs Monorepo

· 2 min read
3sam3
Backend Developer

Overview

There was a release of version 10 in Nest.js this June.

There were some changes like

  • Simple SWC support
  • Module overriding feature in testing
  • Redis wildcard subscription
  • CacheModule separated from @nestjs/common to @nestjs/cache-manager
But, We're only going to talk about SWC

SWC Integration

npm i --save-dev @swc/cli @swc/core
nest start -b swc

That's all you need to do to use SWC.
It's lightning fast when you use in standard mode.

In Monorepo

When It comes to Monorepo, It's not.

Nest.js provides monorepo mode.
Let's Try SWC.

// nest-cli.json
{
"compilerOptions": {
"builder": "swc", // this is equivalent to "-b swc" in cli
"typeCheck": true,
"deleteOutDir": false,
"tsConfigPath": "apps/api/tsconfig.app.json"
}
}

This is what you'll get. build-result

This is due to SWC doesn't have a built-in modules resolution system.
It only builds root project of your repository.

Here come a Webpack

Since webpack has module resolution, it's going to do job for us.

// nest-cli.json
{
"compilerOptions": {
"builder": "webpack",
"deleteOutDir": false,
"tsConfigPath": "apps/api/tsconfig.app.json"
}
}

SWC > swc-build-time

Webpack > webpack-build-time

Of course, I configured a swc-loader in webpack.
and I double checked swc configuration was imported to webpack.

I'm not sure whatw as the problem. but with webpack, swc performance goes down.

And One more thing.

Webpack bundles your project files into a one big chunk. webpack-result

If you're using TypeORM or MikroORM, You'd probably imports your entities like this.
This will break your app.

{
entities: ['dist/**/*.entity.js', 'libs/**/*.entity.js'],
entitiesTs: ['libs/**/*.entity.ts']
}

There is a way to not to bundle your files by configuring entry and output of webpack.config.
But, I won't recommend.

My Conclusion

  • Using SWC in standard mode: go for it.
  • Using SWC in monorepo mode: Don't. unless you can make your own custom scripts that can manage all the problems

Ref

What Happens inside MongoDB Time Series

· 3 min read
3sam3
Backend Developer

Before We Start

We must talk about what Timeseries Data is.

Timeseries Data

A time series is a sequence of data points collected or recorded at successive points in time, typically at uniform intervals.

TimeseriesDB is Database that stores Timeseries Data.

How It differs from traditional DB?

It's always better to see, rather than explain.

rdb.giftimeseries.gif
normal DBTimeseries DB

Features

As you can see, It Indexes Data by Time range.
Every Pros and cons comes from this.

  • Made for storing large set of data
  • Stores data chunks by time range
  • Optimized for INSERT & SELECT
    • Barely provides DELETE & UPDATE

Bucket Pattern

Before Timeseries, There was Schema Design Pattern, Bucket pattern.
It is primitive version of Timeseries collection.
I'll show you how to implement Bucket pattern.

bucket_pattern

Normally, you'd store data like left image.
indexing by id.

In Bucket Pattern, indexes data by time(start_date, end_date) and sensor_id.

This was efficient in 1:N relations, but were some issues.
If BSON size limit of 16 MB is exceeded, special handling needs to be performed, such as separating the loaded data and retrieving it again.

Starting from MongoDB 5.x, the support for Time series collection that internally implements the bucket pattern does the job for us.

etc

You might wanna see how data is actually stored.

Take a look at system.bucket.[COLLECTION_NAME].

{
"_id": "65d3eb80b6473e96f1b570c7",
"control": {
"version": 1,
"min": {
"_id": "65d418420498d3b000d19641",
"timestamp": "2024-02-20T00:00:00.000Z",
"data": {
"value": 0.04303943091823581
}
},
"max": {
"_id": "65d418f00498d3b000d1964b",
"timestamp": "2024-02-20T03:13:52.049Z",
"data": {
"value": 0.8827539992979445
}
}
},
"meta": {
"id": "6093b741070ad40011cabbae",
"key": "meta-data-you-set"
},
"data": {
"_id": {
"0": "65d418420498d3b000d19641",
"1": "65d418ec0498d3b000d19642",
"2": "65d418ed0498d3b000d19643",
"3": "65d418ee0498d3b000d19644",
"4": "65d418ee0498d3b000d19645",
"5": "65d418ee0498d3b000d19646",
"6": "65d418ee0498d3b000d19647",
"7": "65d418ef0498d3b000d19648",
"8": "65d418ef0498d3b000d19649",
"9": "65d418ef0498d3b000d1964a",
"10": "65d418f00498d3b000d1964b"
},
"timestamp": {
"0": "2024-02-20T03:10:58.414Z",
"1": "2024-02-20T03:13:48.823Z",
"2": "2024-02-20T03:13:49.553Z",
"3": "2024-02-20T03:13:50.025Z",
"4": "2024-02-20T03:13:50.371Z",
"5": "2024-02-20T03:13:50.671Z",
"6": "2024-02-20T03:13:50.952Z",
"7": "2024-02-20T03:13:51.272Z",
"8": "2024-02-20T03:13:51.490Z",
"9": "2024-02-20T03:13:51.738Z",
"10": "2024-02-20T03:13:52.049Z"
},
"data": {
"1": {
"value": 0.6954380762758321
},
"2": {
"value": 0.8276404308193761
},
"3": {
"value": 0.06242745352637269
},
"4": {
"value": 0.548645414603997
},
"5": {
"value": 0.8495674421359376
},
"6": {
"value": 0.04303943091823581
},
"7": {
"value": 0.6313514590828619
},
"8": {
"value": 0.8827539992979445
},
"9": {
"value": 0.1477508498242106
},
"10": {
"value": 0.818804826373378
}
}
}
}

Reference

Features You don't want to miss in Raycast

· 2 min read
3sam3
Backend Developer

raycast

Overview

Raycast is spotlight substitute in MacOS

I'm certain Raycast is Much more powerful than spotlight.

Here are several super powerful features that Raycast provides.

Those will reduce repetitive tasks.

Snippets 👑

Down below is the snippets I use snippets

Almost all application provides snippets by themselves. but, they are bound to their app context.

Raycast is not.

Usage

Do you see the words starts with @! in the small boxes? Those are keywords that triggers the snippet.

for example, Everytime I type @!nosql anywhere, pop up kicks in. snippets-kicks-in 
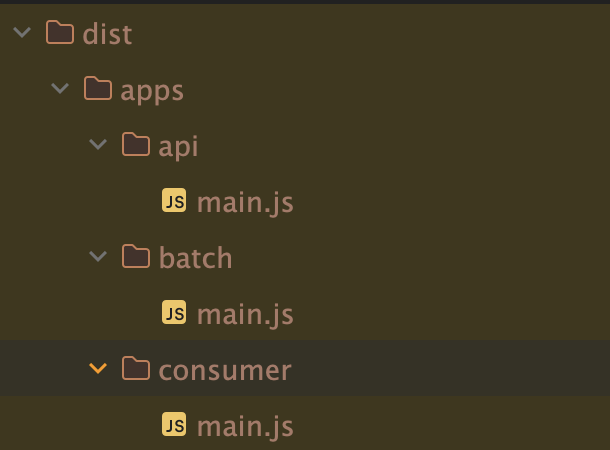
Then Result would be

db.getCollection("users")
.find({
_id: ObjectId("658bc4929b147b07a0fc6adc"),
_id: ObjectId("669dc93023cb0f42216862a1"),
})
.projection({})
.sort({ _id: -1 })
.limit(100);
db.getCollection("users").count();
db.getCollection("users").getIndexes();

All I type was @!nosql and users.
Awesome!

This gets really handy when you use your own infisical server.
It requires server url everytime you login.
I've set infisical server domain in snippet (@!infisical)

Github 🏅

If you're a computer developer, this is the one you want github-plugin-repo

You can search your repositories and clone them at once!

It only requires Login and nothing else.

Amazon AWS 🏅

You can manage your AWS with in cli
personally, I use them to browse through aws web page aws

I know It's pain in the ass everytime you move one page to another in AWS.
Just use console > [aws feature].

This make it much more easier to browse through AWS

OCR 🥈

Documentation Link

This is the plugin that can be downloaded from raycast store (free)

You can easily read text from image with simple command. (requires tesseract installation)

I use this feature just like bookmark of browser.
It's good to use when you dont want to use mouse or trackpad quicklinks

This feature can make you go to page you've register.
pretty much like bookmark of web browser.

Reference

Using D2 diagram in Docusaurus

· 3 min read
3sam3
Backend Developer

d2

Overview

I found a awesome third party library for Docusaurus.

I'd like to show you how I applied it.

How it works

Basically It's bunch of a codeblock as we commonly use.

same old codeblock like this.

Sequence diagram of how it works

d2

How to use D2

If you want advanced configuration see the Offical document

Installation

$ npm install remark-kroki --save-dev

Usage

// docusaurus.config.ts
import { remarkKroki } from "remark-kroki";

export default {
presets: [
[
// you might find "@docusaurus/preset-classic" but no worry. Those are same thing.
"classic",
{
docs: {
remarkPlugins: [[remarkKroki, { server: "https://kroki.io" }]],
rehypePlugins: [
[
rehypeRaw,
{
passThrough: [
"mdxFlowExpression",
"mdxJsxFlowElement",
"mdxJsxTextElement",
"mdxTextExpression",
"mdxjsEsm",
],
},
],
],
},
},
],
],
};

If you want to use your own kroki server, set http://localhost:${port}. I recommend to use personal kroki server using docker image.

Cloudflare blocks your request at some point.

Git Action Deployment

Down below is the yaml script to deploy docusaurus in git action.
Add highlighted code block.

name: Deploy to GitHub Pages

on:
push:
branches:
- main

jobs:
build:
name: Build Docusaurus
runs-on: ubuntu-latest

## add this
services:
kroki:
image: yuzutech/kroki:latest
ports:
- "8000:8000"

steps:
- uses: actions/checkout@v4
with:
fetch-depth: 0
- uses: actions/setup-node@v4
with:
node-version: 18
cache: npm

- name: Install dependencies
run: npm install
- name: Build website
run: npm run build
- name: Upload Build Artifact
uses: actions/upload-pages-artifact@v3
with:
path: build

deploy:
name: Deploy to GitHub Pages
needs: build

# Grant GITHUB_TOKEN the permissions required to make a Pages deployment
permissions:
pages: write # to deploy to Pages
id-token: write # to verify the deployment originates from an appropriate source

# Deploy to the github-pages environment
environment:
name: github-pages
url: ${{ steps.deployment.outputs.page_url }}

runs-on: ubuntu-latest
steps:
- name: Deploy to GitHub Pages
id: deployment
uses: actions/deploy-pages@v4

By this, You can approach http://localhost:8000 to make d2 diagram while build action is in process.

Reference

Hello Docusaurus

· 2 min read
3sam3
Backend Developer

Overview

This Posting is about My first Look on Docusaurus functions

Codeblock

Show Line Number + Line Highlighting

export const formatDate = (date: string) => {
const regex = /^(\d{4})(\d{2})(\d{2})$/;
if(!date.match(regex)) {
throw new Error('날짜 포맷에 맞지 않습니다.')
}

return date.replace(regex, '$1-$2-$3');
};

Error Highlighting

const name = null;
console.log(name.toUpperCase());

Diagram

I personally prefer D2 diagram, but Mermaid is the only diagram docusaurus officially offers.


Import Image

Example banner

This Image Link!

Import Video

Buy Me A Coffee

Support me with:

Buy Me A Coffee